
Intro
Discover expert 7 Anaconda Navi tips, including navigation, mapping, and anaconda handling, to enhance your survival skills and wildlife exploration in anaconda habitats with safety precautions and navigation techniques.
Navigating through the world of data science and programming can be daunting, especially for those new to the field. One of the most powerful tools at their disposal is Anaconda, a distribution of Python and R for scientific computing. Anaconda is designed to make it easy for users to manage packages, dependencies, and environments, allowing them to focus on what matters most: their projects. Here, we'll delve into seven Anaconda Navi tips that can help beginners and seasoned professionals alike to navigate and utilize Anaconda more effectively.
Anaconda's popularity stems from its ability to simplify the process of installing, updating, and managing packages. It comes with over 1,500 packages available for immediate use, including NumPy, pandas, and scikit-learn, which are staples in the data science community. However, mastering Anaconda requires more than just knowing how to install packages; it involves understanding how to navigate its ecosystem efficiently.
For those just starting out, Anaconda can seem overwhelming. The interface, the terminology, and the sheer number of options can be intimidating. But with practice and the right guidance, anyone can become proficient in using Anaconda to enhance their data science workflow. The key is to start with the basics and gradually build up to more complex tasks.
Understanding the basics of Anaconda, including how to create environments, manage packages, and use the command line or graphical user interface (GUI), is crucial. Each of these components plays a vital role in ensuring that projects are well-organized, reproducible, and efficient. Moreover, knowing how to troubleshoot common issues can save a significant amount of time and frustration.
Getting Started with Anaconda

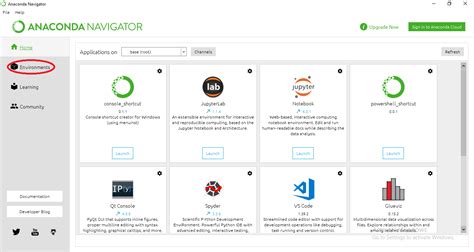
Getting started with Anaconda involves downloading and installing the software, which is available for Windows, macOS, and Linux. The installation process is straightforward, with clear instructions guiding the user through each step. Once installed, users can choose between using the command line interface (CLI) or the Anaconda Navigator, a GUI that provides an intuitive way to manage environments, packages, and projects.
Understanding Anaconda Environments
Anaconda environments are one of the most powerful features of the platform. They allow users to create isolated spaces for their projects, each with its own set of packages and dependencies. This means that projects can be developed and tested independently without interfering with each other. Creating an environment is as simple as using the `conda create` command followed by the name of the environment and the packages you wish to include.Managing Packages with Anaconda

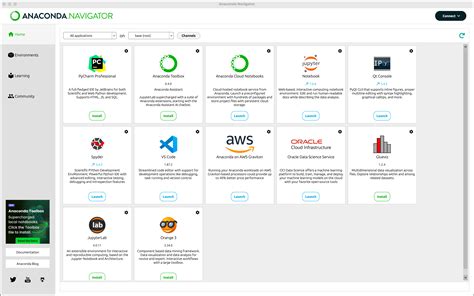
Managing packages is a critical aspect of using Anaconda. The platform provides a comprehensive package repository that includes thousands of packages, each with its own version history. Users can search for packages using the conda search command or through the Anaconda Navigator. Installing packages is straightforward, using the conda install command. Moreover, Anaconda allows users to update packages to the latest versions or revert to previous versions if needed.
Tips for Effective Package Management
- **Keep Your Base Environment Clean:** Avoid installing packages directly into your base environment. Instead, create separate environments for each project to keep things organized and prevent version conflicts. - **Use `conda info` and `conda list`:** These commands provide valuable information about your environment, including the packages installed and their versions. - **Regularly Update Conda and Packages:** Use `conda update --all` to ensure your environment and packages are up-to-date.Utilizing Anaconda Navigator

Anaconda Navigator offers a user-friendly interface for managing environments, packages, and projects. It allows users to launch applications, manage packages, and access tutorials and documentation. The Navigator also provides an easy way to create new environments and clone existing ones, making project setup and collaboration more efficient.
Benefits of Using Anaconda Navigator
- **Easy Environment Management:** Create, manage, and switch between environments with ease. - **Package Management:** Install, update, and remove packages without using the command line. - **Application Launch:** Launch applications like Jupyter Notebook, JupyterLab, and Spyder directly from the Navigator.Advanced Anaconda Tips

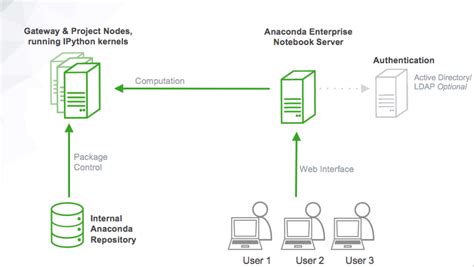
For advanced users, Anaconda offers several features that can further enhance productivity. Understanding how to use conda env export and conda env create can help in sharing environments with colleagues or reproducing environments on different machines. Additionally, learning about channels and how to manage them can provide access to more packages and ensure that you're getting the packages from trusted sources.
Sharing and Replicating Environments
- **Exporting Environments:** Use `conda env export > environment.yml` to create a YAML file that describes your environment. - **Creating Environments from YAML Files:** Use `conda env create -f environment.yml` to replicate an environment on another machine.Common Issues and Troubleshooting
Despite its robustness, Anaconda can sometimes present challenges. Common issues include package conflicts, environment corruption, and difficulties in updating conda or packages. Knowing how to troubleshoot these issues can save time and ensure that projects stay on track. The Anaconda community and documentation are invaluable resources for resolving problems.
Troubleshooting Tips
- **Check Package Versions:** Ensure that package versions are compatible. - **Reset or Reinstall Packages:** Sometimes, resetting or reinstalling a package can resolve conflicts. - **Seek Community Help:** The Anaconda community forum and GitHub issues page can provide solutions to common problems.Conclusion and Future Directions

In conclusion, mastering Anaconda is a journey that requires patience, practice, and a willingness to learn. By following these seven Anaconda Navi tips, users can unlock the full potential of the platform, enhancing their productivity and efficiency in data science and programming projects. As Anaconda continues to evolve, staying updated with the latest features and best practices will be key to leveraging its capabilities fully.
Anaconda Image Gallery


What is Anaconda, and how does it help in data science?
+Anaconda is a distribution of Python and R for scientific computing that makes it easy to manage packages, dependencies, and environments, allowing users to focus on their projects.
How do I create a new environment in Anaconda?
+You can create a new environment in Anaconda by using the `conda create` command followed by the name of the environment and the packages you wish to include.
What is the difference between conda and pip?
+Conda and pip are both package managers, but conda is designed to manage packages and their dependencies for data science and scientific computing, while pip is more general and focused on Python packages.
We hope this comprehensive guide to Anaconda Navi tips has been informative and helpful. Whether you're just starting out with Anaconda or looking to enhance your existing skills, there's always something new to learn. Share your experiences, ask questions, and join the community to continue the conversation about how to get the most out of Anaconda for your data science and programming needs.